
 I like to shake up my work from time to time. To keep from getting bored with how I work. I don't know if this will be the final art, but I thought I would share what I did and how I did it. The eight screenshots above were shot from the two programs I used, then edited, sized, and placed together. You might need to open a other browser window with the above picture in it in order to follow along. And I hope I don't bore anyone with this. If you get bored, just scroll down to the finished piece. :)
1) Adobe Illustrator (AI): I copied my scan from Photoshop (PS) and pasted it into AI. With the scan on it's own level, I lowered the opacity so it was very light in color. This makes it easier for the next step.
2) (AI): On a new layer, I am using the pen tool, the brush tool and the pencil tool to begin to outline the vixen. I'm not worrying about closing areas in to fill with color, I am just outlining, working on thick and thin line weight. Because I don't work like this much, there is a lot of trial and error. The brush tool seems more like a calligraphy tool, in that it has a set angle. You can change it, but I'm not sure if I could on the fly. So I use in sparingly. Most of the time I am outlining a line (Like the curve of her leg) and filling it will black with no outline. Confusing? Sorry. Trying to be as clear as I can. :) With AI, for example, I can create a shape. Fill with a color and outline (stroke) with a color. Or in this case, no outline.
3 & 4) (AI) Here I have finished the outlining (inking) and have filled in areas with flat color. There are plenty of ways to add depth to the coloring, modeling it with shapes and fills and gradients, but I am going to do that in PS.
5) (AI)I decided not to go with the black line art. So here I am changing the color of the line art. I sample the color of the fill and use a slightly darker color for the outline that butts up against it. Much like in animation.
6, 7, & 8) (PS) After everything has a base color in AI, I then export it to PS. Here the process is familiar. I am selecting areas and adding darks and lights to give the figure some depth. These shots show different areas of the art and how it comes together. I then add a background, my signature and copyright. Below is the finished piece.
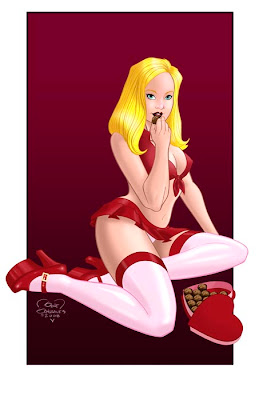 Like I said, I'm not sure this will be the final version, but it was fun to create and fun to share. I hope everyone enjoyed this process.
 Like I said, I'm not sure this will be the final version, but it was fun to create and fun to share. I hope everyone enjoyed this process.
4 comments:
Great post...very interesting seeing all the screen shots. As an art collector I worry at times about everything going to the computer with no tangable art other than a file, but gotta admit I can see the value to the artist in this post like droping out the inked outline etc... The final art looks great wouldnt change a thing!
Hey Brian, I WOULD change something.... the address of the owner... if it were tangible!
Nice work Gene and again a great big salute for letting us see the process.
Gene,
Yes, I love when you share the process. I believe there is the opinion of some out there that the artwork is going all software driven and that anyone can be an artist. But to be a true professional, you have to use the software as a tool to enhance your talents! Thanks for sharing.
Gary
She is gorgeous Gene great seeing the process on this one..
Thanks hon. hugs xo
Post a Comment